Showing posts with label DIY. Show all posts

Sunday, October 18, 2015

Storybook Pumpkin Project

My daughters school is having a storybook pumpkin decorating contest. The rules are simple: decorate a pumpkin  creatively (no carving or puncturing) like your favorite storybook character. 

My daughter chose 'The Nightmare Before Christmas' as her book & picked "Sally" as her character. 


We used:
• Acrylic paint
• 1 pumpkin
• Glue gun + glue sticks
• Red yard 
• Scissors 
• 1 large poster board 
• Paint brushes 
• Crayons
• Markers 


First we painted the pumpkin all around with Apple Barrel #21973E Summer Sky. This blue pops & is really close to her actual color in the book. 
This took sometime to get the entire thing even. Be sure the pumpkin is dry when you apply new layers or it will peel. Next we added the eyes & features after the blue was dry. 

Then we cut long strands of red yard to make her rag doll hair. Because the glue gun is very hot I glued on the yard to the pumpkin. 

While the pumpkin dried yet again we worked on Sally's dress to attach. We made the neck extra long & thin to stick underneath the pumpkin. 

After it was all colored we cut it out & attached it to the pumpkin.


And this was our finished product for the storybook pumpkin contest. 

Sunday, September 6, 2015

Medicated Gummies


My two year old son just came down with the worst cold. If your toddler is anything like mine then I'm pretty positive they HATE taking medicine. He's stuffy, running fever, coughing, all of the above with this cold. I tried giving him the medicine with the syringe but he instantly spit it out. Son, I'm trying to get you better!!! 

Anyway, a year or so ago I learned the benefits of natural gelatin & making healthy gummies. Which we all know toddlers LOVE candy. 


 (Here is a link to a good read if you're uninformed on the benefits of natural getatin: http://www.grassfedgirl.com/top-20-health-benefits-of-gelatin-helps-prevent-arthritis-cellulite-stretch-marks-wrinkles-brittle-bones-and-more/)

*But guys, it needs to be NATURAL! Not that crap next to the Jello at your local grocery store. 


Okay, so here's what I did. First you need your medication. I'm not going to put doses because every toddler ranges.  First I looked at the dose for my sons age & weight. I pored it into the cup that came with the medicine & set aside. 


Next I put a small pot on low heat with a splash of organic sugar free cranberry juice & let it heat just a little bit. To about luke warm. I put in one teaspoon of gelatin, and mixed vigorously so it didn't clump. Turn off heat & remove from heat. Next I poured in the medicine to the cranberry mixture and mixed. (Remember you are NOT cooking the medication)

Next you pour the mix into your molds. (Remember the dose you poured into the cup is for one serving. So however many gummies you create from this batch your child can eat safely) **only make one dose at a time


Place mold in refrigerator for about twenty minutes. That's it! You have gummy medicine that your toddler won't spit out! 

Saturday, September 5, 2015

Maka Albarn DIY kids cosplay


So this year my daughter decided as a cosplay for Realmscon & for Halloween she wanted to be Maka Albarn from Soul Eater. It's her all-around favorite anime.


We started by thrifting the basic pieces to her cosplay. The white shirt, yellow vest, striped tie & red plaid skirt.All together we spent about $3. 


Here's a side by side. 


Her wig I ordered on eBay for $15.

My best friend made Rae the coat. It came out perfect! 


Next came her weapon, a scythe that's Soul Evans in weapon form. In the anime the scythe is massive. So I knew her's needed to also be big but light for her to hold in the cosplay contest 

First I drew out the shape of the  scythe on two full size poster boards to use as s blueprint. My boyfriend cut out the shape with a razor on cardboard x2  for sturdiness.


For the base we had a long curtain rod from our old house. It's hallow, the exact shape we needed & light. So it worked perfect. 


Next we started tapping the pieces together with duck tap. Lots & lots of duck tap. We started at the tip of the  scythe and worked our way up to the eye. The reinforce I added crumbled paper in the center of the blade since it created a pocket. This gives it dimension. Also the eye part is stuffed with crumbled paper & taped shut.


Then I paper mâchéd the whole thing to have a smooth surface to paint on. )For my glue I used three parts water to three parts flour and heated it just before it boiled. The glue was perfect, thick & held really well.)


I let it dry outside for two days. 

Then it was time to paint it. 

It took a lot of layers but eventually..... 


And this was our finished product! 


The boots I thrifted for $4 & added stripes of white duck tape. 


She loved it & the cosplay was a huge hit! We couldn't walk ten steps without someone stopping her to take a photo!

Monday, August 3, 2015

DIY Walking Dead Shoot


My love for zombies has no limit. Earlier this year we cut my daughters long locks into an adorable short manageable little do. After watching three seasons of TWD in three days... I noticed how much Rae looked like Maggie. A few days later we purchased a hat for Jasper & it reminded me of Glenn. 


Then it dawned on me. This would make such an adorable little shoot! I happen to have a really good camera too that I've been meaning to start utilizing. 


So this is the outcome!! I hope y'all enjoy! 


She had to get a photo with her dog. Lol 

Thursday, July 16, 2015

Zombabes 26 birthday


July 16, 2015.


It's 2:32 in the morning. I've been setting up this mini surprise for my boyfriend while he sleeps for his twenty-sixth birthday. We're giant horror/gore people but lately we've been on a Walking Dead kick. So I felt it fitting to use a zombie theme for my zombabe!  I kept the color scene simple. Black & red to match the gift I made for him that I'll post on the bottom. 


The cake was a fun craft. I cheated & used red velvet cake mix (the box) and made it as directed. While it was baking I made edible blood for the topping. I used a squirt of red food gel and five teaspoons of chocolate syrup. Mixed until I got the color I wanted then set aside. After the cake cooled, I stacked it & iced it then poured the blood over the top & threw some on top of it with a fork for a splash effect. I found these zombie arms & figures at the Dollar Tree and knew I had to use them. 


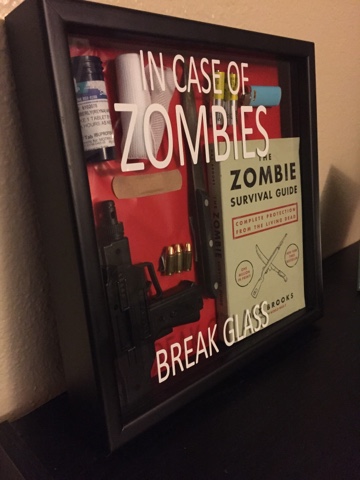
On to the gift. I wanted to make a zombie survival box. I purchased a shadow box from Walmart for $9. The gun is a toy gun from the Dollar Tree that I spray painted black. The bullets are real and we already had them. The book I already had, and the accessories I picked up at the Dollar Tree. You can seriously survive a zombie apocalypse at The Dollar Tree! Ha!!  


My friend Jennifer who runs Behind The Theme made me the decal for the box. 


What's happening now.

Wow! It's been a good minute since I've used my my little writing outlet. How is everyone doing? Life is all kinds of insane, but ...